Monday, September 16, 2013

Phased Update

Let's do a recap now that I've seen everything exposed (but behind the radio).

  1. Install rear speakers. Run wire and pass into B-Pillar. (1.5 hr each)
  2. Install front speakers; crossovers are in the cabin so the door can be buttoned up. (2.5 hr each)
  3. Install amp and power, but no audio.
  4. Tap off of stereo out and keyed power. Bring it to the amp. Switch over front speakers audio to amp.
  5. Switch over rear speakers' speaker wires and button up rear doors. Run wire from B pillar to amp.
My time estimates reflect being slightly distracted. 

Sunday, September 15, 2013

Passenger's side front door

Front doors are definitely more work than rear doors - and NOT because I'm using components.
Let's see if I can remember.

  1. Remove door panel
  2. Unclip speaker wire and remove speaker
  3. Pull wheel well molding and unclip electrical connector.
  4. Remove wire channel from car and door.
  5. Run speaker wire through wire channel - this took about 30 minutes. I'm not sure why, but it's tighter in there with the existing wire. I passed the heavy copper fish wire from the top to the bottom, then I tape the speaker wire to the fish wire. I was using 10 gauge solid, insulated wire for this. I had to unscrew the door stop for this - even if it only got me 1/4" more room
  6. Replace the wire channel - this was difficult too - The upper portion wasn't challenging. The lower portion is secured to a large plastic, uh, thing. You need to remove this plastic piece from the lower a pillar - it snaps out. Then secure the wire channel to it, it only snaps on in at 120 degree angles.

    Wirechannel hanging off the top of the plastic pass through. It has to secure all the way around. then you click the pass through back to the A pillar.
    Once the wire channel is secured, the plastic pass through clicks back into the A pillar.
  7. Before you secure the lower portion of the wire channel to the car, you need to clip the speaker wires in the harness, so that you can pull them back into the cabin and connect them them to your cross over. So I think it's the brown/green wire and dark green wire. Clip and pass back into the cabin.


Monday, September 9, 2013

Rear Door - start to finish


  1. Unscrew two Philips head screws in door. Use a small flat-head screwdriver to remove cover. 
    Exhibit A - rear door

  2. Pull bottom of door away from the door frame. You will hear the plastic fasteners pop out of the door. This is fine. The top of the door-panel rests upon a lip where the glass recedes into the door. You just pull the door-panel up and over the lip. No more than 1". 
  3. Unclip the window connector, and unsnap the ball-ended cables from the lock and latch.
    Press in on that tab to pull out of door plug.
     
    pull the yellow and black tubes out of the lock/latch mount. You can then pop the ball on end of the cable out of the lock or latch. 

  4. Place the door-panel somewhere safe.
    Exhibit B - door panel removed. Window wire connector, lock, and latch all hanging.
  5. Unscrew the 3 screws that secure the speaker to the door. After that, cut the speaker wire so you can remove the speaker. My replacement speakers needed bare ends. I believe there are drop-in plugs for the OEM connector. I'm not going that route. You could easily unclip the speaker from the connector and go from there. 
  6. Line up your speaker spacer and mark the face where you will pre-drill the holes for the speaker, i.e., we are noting which side of the spacer faces the door and which faces into the car. I wrote ND (no door) on the cabin-side of the spacer. I also wrote a "R"ear on the thin side that's oriented toward the back of the car - where my hand is. You need to get up close to the spacer/door to eye which way the pre-drilled holes align with the nylon nuts embedded in the door. You could insert your screws as a test.
  7. OPTIONAL - At this point I want to run my larger gauge speaker wire through the door so I don't have to do it when I install the amp. You will see a rubber wire guide run from the B-pillar to the door. Pull this out from the door and from the B-pillar. Fish a piece of thick wire through the wire channel, tape ~6' of speaker wire to one end of the fish wire and pull through. I end up leaving about 1' inside the door and 5' inside the pillar. This should be more than enough because the speaker will be mounted under the driver's seat. 
    Pull the wire guide out of the B-pillar.
    Pull the wire guide out of the door. This image shows my fish wire exiting the wire guide.
    I taped my speaker wire to the fish wire and started feeding it into the top of the wire guide.
    Pull the fish wire through and feed the long end of your speaker wire down the wire guide.
    All pulled through. I will stuff this back into the B-pillar for later.
  8. Place your speaker on the spacer and line it up exactly. I dot a sharpie to where I should pre-drill the holes. I will use #8 x 1/2 machine screws and a 3/32" drill bit. You don't have to drive the screw all the way through the 3/4" spacer, but either way is fine. 

    Place dots where you want to predrill the holes, by placing the speaker over the spacer. I made a small awl mark over the dots to give the drill something to bite into.
  9. These speaker mounts don't seal flush to the door. We need to put > 1/2" of gasket between the mounts and the door. I used the 5 year foam weather stripping, 3/4" x 7/16" single sided adhesive tape from home depot. I cut the gasket into 1" pieces and create a circle around the speaker opening in the door. I do the same thing on the speaker mount itself - the side that faces the door, but in addition to cutting 1" strips, I cut them in half so they are about 3/8".
    One piece of gasket tape installed. Continue all the way around
  10. This is with gasket tape only stuck on the door. There is a gap, so we have to put gasket tape on the speaker mount also.
    Half-width gasket tape run around the spacer - on the DOOR side.
  11. Mate the speaker+gasket tape and door+gasket tape together and screw through the spacer to the door. I believe I used #10 x 1 1/2" screws, which should work perfectly in the plastic nuts that are already in your door. As the screws secure to the door, the gasket tape compresses a lot. Try to keep the pressure from each screw equal to the others.  
  12. At this point I screw those two ends to the speaker connector. Since the speaker wire connector is a small, matchbox sized-object and This is somewhat temporary, I used two zipties to mount it in the door. One ziptie to the wire bundle in the door, and through that, to the speaker connector. I zip it tight. Use this page as a guide so you know which wire is + and which is -.
     
  13. Finally I mate the speaker to the spacer and screw it in. Note: there's a gasket that goes between the speaker and the spacer, but I will install that when during the amplifier install.
  14. Disassembly is reverse of assembly. Plug in the wires to the door-panel, reattach the cables to the lock and latch. Place the door panel over the top lip, ensure all the fasteners are in place and close up the door. You are done.
    Place the door panel up and over that lip on the left, under the fixed window.

Friday, August 30, 2013

25%

I have one speaker installed, wired, working, and buttoned up.
Next up is the left side rear door.
Here's my wisdom to people doing a similar phased install.

  • Run your speaker wire through the door at this point, leave about 1' in the door and maybe 12-20' wrapped up in the pillar cover for later. I think that it might make sense to run the passenger side speaker wire, to tie into the amp, back and across the rear seat rather than forward and under the dash. There's less clutter to deal with - at least the rear speaker.
  • I used the 5-year foam gasket from le home depot. I cut 1" strips and stuck them on the door and complimentary 1" strips and stuck them on the spacer. Together they make for a good seal. The question is how this solution will age. 
  • In the passenger rear door, the red/white wire is negative (!!) the green grey wire is positive. Thanks to this link.
When I do the install for rear door #2 I'll include pictures.

Thursday, August 29, 2013

Running wires and fitting spacers

Last night I figured out which way the spacers mate to the door. They are not symmetrical, so you can't tell without aligning them to the door and checking that the holes line up.

When securing the spacers to the door, you want the surface between the spacer and the door to be sealed such that no air escapes and there are no loose surfaces to rattle. You can use weatherstripping foam, in a roll, adhesive backed to seal the surface. It looks like I will make a circle of foam on the spacer and a circle of foam on the door. the foam compresses very well so I think this plan with create a relatively tight seal. I could probably seal the gap closer to 100% with silicon caulk, but I'd rather do the less obtrusive tape for now.

After test fitting the spacer, I passed a length of speaker wire through the rubber channel that goes between the car pillar and the door. There are already OEM speaker wires and power window wires in this channel, so I had to add the speaker wire. I figured to do this now so that I won't have to mess with running a speaker wire in a hard spot when the spacer and speaker are already installed. I'll switch over to the speaker wire when I install the amp in phase two, but for now the wire can just hang.

Finally I pre-drilled the speaker to the on spacer. I'm going to use 4 x 8-1/2 sheet metal screws  to secure the speaker to the spacer. The speaker itself came with 8- 1/4 (or maybe even 8-1/8" sheet metal screws) - tiny screws. they will work too and I might implement them if I don't get to the store to get the 1/2" length. Actually I believe that by anchoring the screws a full 1/2" into the plastic, it will strain the spacer less.

So I did a lot of fitment. I think I'll take more explicit pictures when I wire up the second rear door, after I figured out and executed the process once.

Saturday, August 24, 2013

Spacers?

I purchased my spacers for subaruaudio.net. I requested spacers for a 2012 NON-WRX impreza, and submitted the speakers I was planning to install. After a quick paypal payment, the package arrived very promptly.
Since the install is ongoing, I can't comment on how the spacers fit into the process, but so far so good.
Here's a web page that's relevant to my project: http://www.subaruaudio.net/installations/2012-impreza-non-wrxsti/

Other rear door pictures

  1. When removing the rear door panel, note the tab you have to depress to pull the plug out


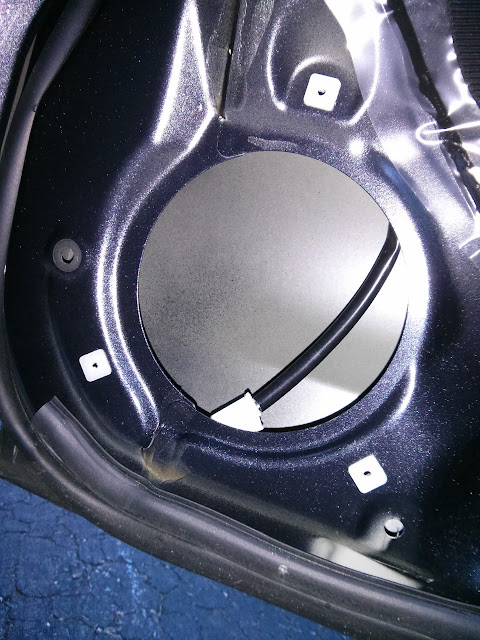
  2.  This is the diameter of the speaker cut out in the door. About 5 1/16".


  3. Here's the distance between the two lower speaker frame screw points.About 5 5/8". The distance to the other hole above these was further than my 6" caliper could reach.


  4.  Here's a straight on shot of the door with speaker removed. Notice the contours of the door panel. Sealing between the spacer and the door is going to be a challenge.


  5.  Here's a side shot of the spacer mated to the door. Note the large gap that we'll have to seal.


  6.  I believe that gap is about 1/4". I think I'm going to add foam gasket from both the door and the spacer.


Rear Speaker Measurements

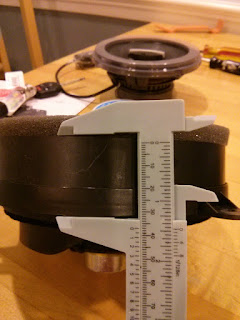
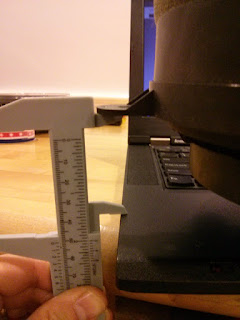
Rear speaker in mount removed from door. Distance between bottom of mounting flange to top of speaker frame. Just under 1.5".
 Measure from bottom of mounting flange to furthest point of speaker. Looks like 2".

So you could bring your speakers forward about about an inch without any worry, probably as much as 1 3/8". The spacers I had made for me were 3/4".
So with my JBL P662s, and the 3/4" spacer, I have about 1/4" more clearance on the window side and 1/8" more clearance on the door panel side.

What wire?

People argue over what size wire you should buy for any application you can think of. Companies want to sell you over-spec'd high-margin products. I believe in buying as much as you need and no more.Both your speaker wire and amp power wire should basically let the current flow and restrict it minimally. Too much current restriction and the wire heats up and can cause component failures (amp) or attenuate the sound (speakers).

Speakers:
This link has a wonderful, lengthy discussion about speaker wire. My take away is that 16 gauge should be fine. I think that 18 would be OK also. I might do 18 to make it easier to run through existing channels. 

Amp:
The manual for the Alpine amp says to use 8 AWG (gauge) power wire, so there you go. I was looking for an Input Current spec as a check, but that seems to be unavailable. 8 AWG sounds like the right thing to do.

Major components


  • JBL P662 coaxial speakers for rear
  • JBL P660C Component speakers for front
  • Alpine MRP-F300 amplifier

High level task order

Essentially you can install the amp or speakers first.

If you install the amp first you get more volume from your stock speakers and you complete the hard tasks earlier. Then when you add the speakers, there's more of a reveal - Amp first is delayed gratification.

If you install the speakers first there's a more noticeable difference right away, but adding the amplifier second puts the harder task at the end of the project- I've always like to get the hard stuff done first.

Speakers first task order:
  1. Install front speakers
  2. Install rear speakers
  3. Wire speakers into existing HU
  4. Install amplifier power cable
  5. Install amplifier
  6. Wire amplifier to HU
  7. Wire speakers to amplifier
Amp first task order:

  1. Install amplifier power cable
  2. Install amplifier
  3. Wire amplifier to HU
  4. Wire speakers to amplifier
  5. Install front speakers (including wiring)
  6. Install rear speakers (including wiring)
I have decided to install the speakers first.

The project: Upgrade car stereo

Because I love music, love DIY, spend about an hour in my car daily, and like hands on projects, I thought to upgrade the stereo in my car. When car shopping in 2012 I considered all of the premium sound systems, and none of them were that great. Common knowledge is that you get much more bang for your buck when you purchase and install aftermarket stereo components in your car. So this project represents many things that I love coming together.